Tattoo transfer paper, also known as stencil paper, is an essential tool for temporarily applying tattoo designs on the skin. In this tutorial, we will guide you through the process of printing tattoo stencils with an inkjet printer, offering step-by-step instructions and helpful tips to ensure successful stencil printing.
Whether you are a tattoo artist or an enthusiast looking to create your own stencils, this article will provide you with the necessary knowledge to utilize an inkjet printer for tattoo stencil printing. We will explore different methods, including creating stencils by hand, digitally, and using a thermal printer.
Creating tattoo stencils with an inkjet printer offers convenience and precision, allowing you to transfer intricate designs onto the skin. Follow our tutorial to learn about the process, from preparing inkjet stencils to applying them on the skin.
Stay tuned for the upcoming sections, where we will delve into the specific techniques for creating hand-drawn and digital stencils, as well as using a thermal printer. We will also provide tips for successful stencil printing and compare the pros and cons of different stencil methods.
Whether you’re a beginner or an experienced tattoo artist, this comprehensive tutorial will equip you with the knowledge and skills to produce high-quality tattoo stencils with an inkjet printer. Let’s dive in!
Creating Tattoo Stencils By Hand
If you’re looking for a traditional approach to creating tattoo stencils, the hand-drawn method is a popular choice among tattoo artists. This method allows artists to build muscle memory of the design before tattooing, resulting in precise and confident tattoo work. To create a hand-drawn tattoo stencil, you’ll need a few essential tools: your design printed on white paper, a pen or pencil, and thermographic tattoo transfer paper.
Start by printing your design on white paper using an inkjet printer. Make sure the design is the right size for the tattoo you’re planning to create. Next, grab your pen or pencil and trace the design onto the thermographic tattoo transfer paper. This transfer paper will allow you to transfer the design onto the client’s skin later on. Take your time and be meticulous during this tracing process to ensure accuracy.
Once you’ve traced the design onto the transfer paper, carefully cut out the stencil. Make sure to leave some excess space around the design to make it easier to handle and apply to the skin. Now, you’re ready to apply the hand-drawn stencil to the client’s skin using a stencil transfer solution or stick deodorant. This will create a temporary tattoo outline that you can follow during the tattooing process.
Hand-Drawn Tattoo Stencil Tutorial:
- Print your design on white paper.
- Trace the design onto thermographic tattoo transfer paper.
- Cut out the stencil, leaving excess space around the design.
- Apply the stencil to the client’s skin using a stencil transfer solution or stick deodorant.
Creating tattoo stencils by hand offers a personal touch to your artwork and allows you to refine your design skills. It may take some practice to perfect this method, but the results are worth the effort. Whether you’re a beginner or an experienced tattoo artist, the hand-drawn stencil technique is a valuable tool in your artistic arsenal.
| Advantages of Hand-Drawn Stencils | Disadvantages of Hand-Drawn Stencils |
|---|---|
| Allows for building muscle memory of the design | Time-consuming process |
| Offers a personal touch to the artwork | Potential for human error in tracing |
| Can be useful for custom designs or intricate details | It is difficult to resize or make changes to the stencil |
As you can see, hand-drawn tattoo stencils have their advantages and disadvantages. Consider your artistic style, time constraints, and the complexity of the design when deciding whether to opt for a hand-drawn stencil. Now that you have a basic understanding of the hand-drawn method, let’s explore another approach to creating tattoo stencils: the digital method.
Creating Tattoo Stencils Digitally
For tattoo artists who prefer digital tools, creating tattoo stencils digitally offers a precise and efficient option. Using apps like Procreate on an iPad, artists can bring their designs to life with ease. To begin creating digital tattoo stencils, you will need an iPad and the Procreate app.
Start by importing your design into Procreate and use the various tools and brushes available to refine and perfect your stencil. Procreate offers a wide range of customization options, allowing you to adjust the size, opacity, and line thickness to achieve the desired result. Once you are satisfied with your design, you can create a new layer and trace over it to create a clean and precise stencil.
Once your stencil is ready, you can export it as a high-resolution image and print it using tattoo transfer paper. Ensure that you follow the manufacturer’s instructions for printing on the specific type of transfer paper you are using. Remember to select the appropriate settings on your printer to ensure the best print quality for your stencil.

Benefits of Creating Digital Tattoo Stencils:
- Increased precision and accuracy in stencil creation
- Ability to easily make adjustments and revisions to the design
- Efficient workflow with digital tools and customization options
- Option to save and reuse stencil designs for future tattoos
Tips for Creating Digital Stencils:
- Take advantage of Procreate’s various brushes and tools to enhance your stencil design.
- Experiment with different layers and opacity settings to create depth and dimension in your stencil.
- Regularly save your progress to avoid losing any work.
- Print a test stencil before committing to the final print to ensure the design transfers accurately.
Creating Digital Stencils Tutorial:
Follow these steps to create digital tattoo stencils using Procreate:
- Import your design into Procreate.
- Use the various tools and brushes to refine your stencil.
- Create a new layer and trace over your design to create a clean stencil.
- Export your stencil as a high-resolution image.
- Print the stencil using tattoo transfer paper.
| Pros of Digital Tattoo Stencils | Cons of Digital Tattoo Stencils |
|---|---|
| High precision and accuracy | Requires an iPad and Procreate app |
| Easy to make adjustments and revisions | Initial investment in digital tools |
| Efficient workflow with customization options | Learning curve for using digital tools |
| Ability to save and reuse stencil designs |
Using a Thermal Printer
Thermal printing is an efficient and precise method used by tattoo artists to create stencils for tattooing. With the use of a thermal printer, you can easily transfer your designs onto stencil paper with accuracy and speed. In this section, we will guide you through the step-by-step process of using a thermal printer to print tattoo stencils.
Step 1: Loading the Thermal Paper
Start by loading the thermal paper into the printer. Make sure the printer is powered on and open the paper tray. Place the thermal paper roll into the designated slot, ensuring that it is aligned properly. Close the paper tray securely to prevent any paper jams during the printing process.
Step 2: Printing the Design
Once the thermal paper is loaded, it’s time to print your tattoo design. Connect your computer or device to the thermal printer and make sure it is recognized by the printing software. Open the design file and select the correct printer settings, such as paper size and print quality. Press the print button and allow the printer to work its magic, transferring your design onto the thermal paper.
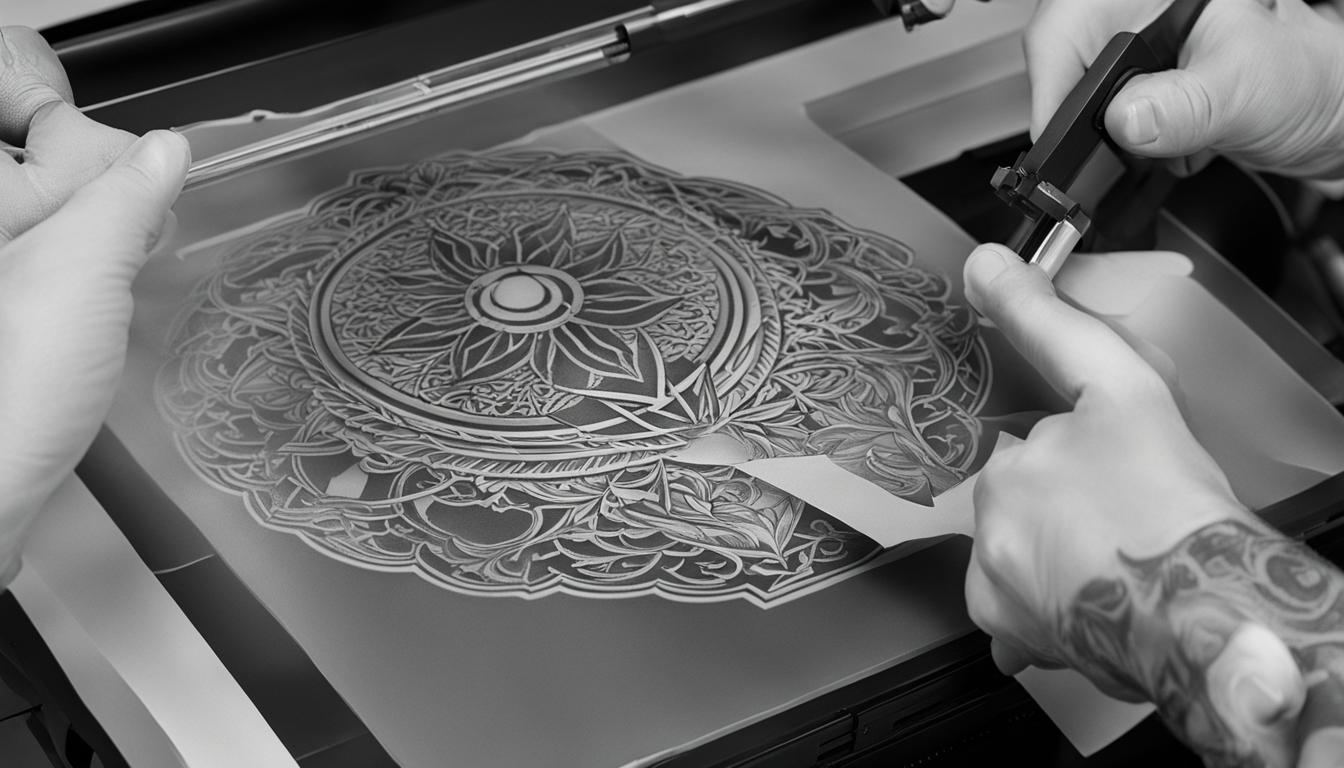
Step 3: Peeling off the Stencil
After the design is printed, carefully peel off the printed stencil from the thermal paper. Take your time and ensure that the stencil comes off cleanly without any tears or smudges. A well-printed and intact stencil will make the tattooing process much easier and more accurate.
Using a thermal printer for stencil printing offers numerous advantages, including fast printing speed, precision, and durability. By following these step-by-step instructions, you will be able to utilize a thermal printer effectively to create high-quality tattoo stencils for your clients.
Preparing Inkjet Stencils for Printing
Getting your inkjet stencils ready for printing is an important step in the tattooing process. Whether you’re a professional tattoo artist or just starting out, proper preparation ensures that your inkjet printer produces high-quality stencils. In this section, we’ll guide you through the steps of preparing inkjet stencils, including filling your inkjet printer for stencil printing and choosing the right paper.
Before we dive in, let’s take a moment to appreciate the convenience and versatility that inkjet printers offer. With an inkjet printer, you can easily create custom tattoo stencils in the comfort of your own studio. No need to rely on expensive thermal printers or spend hours hand-drawing stencils. Inkjet printers provide a cost-effective and efficient solution for stencil printing.
Now let’s talk about filling your inkjet printer for stencil printing. It’s important to use specialized inkjet stencil ink to ensure optimal results. This ink is specially formulated to provide crisp and clear stencil prints. Follow the manufacturer’s instructions to fill your ink tanks with the stencil ink, ensuring that you have enough ink for the printing process.
Next, let’s discuss the paper selection. Choosing the right paper is essential for achieving high-quality inkjet stencils. Look for stencil paper specifically designed for inkjet printers. This paper has a smooth surface that allows the ink to adhere well, resulting in sharp and detailed stencil prints. Avoid using regular printer paper, as it may not provide the desired results.
With your inkjet printer filled with stencil ink and the right paper in hand, you’re now ready to move on to the printing process. In the next section, we’ll provide you with a step-by-step guide on how to print inkjet stencils, ensuring that you achieve accurate and reliable stencil transfer. Stay tuned!
Preparing Inkjet Stencils Step by Step

Preparing inkjet stencils for printing requires a few essential steps to ensure optimal results. Follow this step-by-step guide to get your inkjet printer ready for stencil printing.
Filling Inkjet Printer Ink Tanks
The first step is to fill the ink tanks of your inkjet printer with specialized inkjet stencil ink. This specialized ink is designed to produce high-quality stencils that won’t smudge during the tattooing process. Refer to your printer’s manual for instructions on how to access and refill the ink tanks. Take care to fill each tank with the appropriate ink color, following the manufacturer’s guidelines.
Loading Inkjet Printer with Stencil Paper
Once the ink tanks are filled, it’s time to load the inkjet printer with stencil paper. Use high-quality stencil paper specifically designed for inkjet printers to achieve the best results. Open the printer’s paper tray or rear manual feed, depending on your printer model. Align the stencil paper neatly and adjust the paper guides to secure it in place. Ensure that the paper is loaded straight and properly aligned to avoid paper jams or misprints.
With the ink tanks filled and the stencil paper properly loaded, your inkjet printer is now prepared to produce high-quality tattoo stencils. Remember to select the appropriate printer settings, such as print quality and paper type, to achieve the desired stencil output. Experiment with different settings to find the optimal combination for your printer and stencil paper. Following these steps will help you create precise and smudge-free inkjet stencils for your tattoo designs.
Choosing the Right Paper for Inkjet Stencils
When it comes to printing inkjet stencils, selecting the right paper is crucial for achieving high-quality results. Different types of paper can impact the clarity, durability, and transferability of your stencil design. Here, we explore the various options available and provide guidance on choosing the best paper for your inkjet printer stencils.
Types of Paper for Inkjet Stencil Printing
There are several types of paper that work well for inkjet stencil printing. Each type offers unique characteristics that can enhance the performance of your stencils. Here are some popular choices:
- Regular printer paper: This lightweight and affordable option can be suitable for basic stencil designs. However, it may not hold up well to heavy ink saturation or repeated use.
- Vellum paper: Vellum is a translucent paper that allows light to pass through, making it ideal for tracing designs onto stencil paper. It offers good ink absorption and is compatible with most inkjet printers.
- Waterproof paper: If you’re looking for extra durability, consider using waterproof or water-resistant paper. These papers are designed to withstand moisture and can prevent smudging or bleeding during the tattooing process.
- Photo paper: Photo paper is a high-quality option that produces vibrant and detailed prints. It is excellent for intricate stencil designs and offers a professional finish.
When selecting paper for inkjet stencil printing, consider the level of detail in your design, the ink absorption capabilities of the paper, and the specific requirements of your inkjet printer. Experiment with different types of paper to find the one that best suits your needs.
Comparison of Inkjet Stencil Paper Types
| Paper Type | Features | Recommended Use |
|---|---|---|
| Regular Printer Paper | Affordable, lightweight | Basic stencil designs with minimal ink saturation |
| Vellum Paper | Translucent, good ink absorption | Tracing designs onto stencil paper |
| Waterproof Paper | Durable, moisture-resistant | Preventing smudging or bleeding during tattooing |
| Photo Paper | High-quality, vibrant prints | Intricate stencil designs requiring a professional finish |
Remember to always check the specifications and compatibility of the paper with your inkjet printer before purchasing. Additionally, consider the size and thickness of the paper to ensure it fits your printer’s capabilities. By choosing the right paper, you can enhance the precision and longevity of your inkjet stencils, resulting in outstanding tattoo quality.
Printing Inkjet Stencils
Once your inkjet printer and stencil paper are prepared, it’s time to print your tattoo stencils. Follow this step-by-step guide for inkjet stencil printing to achieve high-quality prints that are ready for accurate stencil transfer.
Gather Your Materials
Before you start printing, make sure you have all the necessary materials at hand. You will need:
- An inkjet printer that is compatible with stencil printing
- Inkjet stencil ink
- Stencil paper suitable for inkjet printers
Load the Stencil Paper
Open the paper tray of your inkjet printer and carefully load the stencil paper. Make sure to align the paper properly to avoid any misprints or jams during the printing process.
Select the Appropriate Settings
Once the paper is loaded, open your printer settings on the computer. Select the highest print quality for optimal stencil clarity. Adjust any specific settings recommended by the manufacturer of the stencil paper or inkjet printer for the best results.
Print Your Stencils
With the settings properly adjusted, you are now ready to print your inkjet stencils. Hit the print button and wait for the printer to finish the job. Avoid touching the printed stencils right away to prevent smudging. Allow them to dry completely before handling.
Congratulations! You have successfully printed your tattoo stencils with an inkjet printer. Now you can move on to the next step of applying the stencils to the skin and creating beautiful tattoos.
| Advantages | Disadvantages |
|---|---|
| Cost-effective compared to thermal printers | Potential risk of smudging if not dried properly |
| Accessible and widely available | Possible limitations in image resolution and detail |
| Easy to use and set up | Slightly longer printing time compared to thermal printers |
Applying Inkjet Stencils on the Skin
When it comes to tattooing, transferring inkjet stencils onto the skin is a crucial step. By following the correct application process, you can ensure a clean and precise tattoo design. Here are some essential tips for applying inkjet stencils:
1. Remove the protective layer: Before applying the stencil, make sure to remove the protective layer from the inkjet stencil paper. This will expose the adhesive side of the stencil.
2. Position the stencil correctly: Carefully place the stencil on the desired area of the skin. Take your time to align it correctly, ensuring that the design is where you want it to be.
3. Create a roadmap: Once the stencil is in place, use a pen or a fine-tip marker to gently trace the outline of the design. This will create a roadmap that will guide you during the tattooing process.
By following these tips, you can ensure a successful transfer of your inkjet stencil onto the skin. Remember to take your time and be precise in your application. Happy tattooing!

Hand-Drawn vs. Thermal-Printed Stencils: Choosing the Right Method
When it comes to creating tattoo stencils, artists have two main options: hand-drawn or thermal-printed stencils. Each method has its own set of advantages and disadvantages, and choosing the right technique can greatly impact the final result of your tattoo design. In this section, we’ll compare these two stencil types to help you make an informed decision.
Hand-Drawn Stencils
Hand-drawn stencils offer a more traditional approach to tattooing. Many artists prefer this method as it allows them to build muscle memory and a deeper connection to the design before tattooing. Hand-drawn stencils offer more flexibility and allow for easy resizing and customization. Additionally, artists can easily modify and adapt the stencil during the tattooing process, if needed.
Thermal-Printed Stencils
Thermal-printed stencils, on the other hand, provide precise and consistent results. With the use of a thermal printer, artists can create detailed and intricate designs with ease. Thermal-printed stencils offer a level of precision that is difficult to achieve with hand-drawn stencils. They are also time-saving, allowing artists to quickly transfer designs onto the skin without the need for manual tracing.
Choosing the Right Stencil Method
Ultimately, the choice between hand-drawn and thermal-printed stencils depends on your personal preference and the specific requirements of your tattoo design. If you value creative freedom, flexibility, and a more organic approach, hand-drawn stencils may be the right choice for you. On the other hand, if precision, speed, and intricate details are your priorities, thermal-printed stencils can provide the best results.
| Hand-Drawn Stencils | Thermal-Printed Stencils |
|---|---|
| Offers creativity and flexibility | Provides precise and consistent results |
| Allows for easy resizing and customization | Offers intricate details that are difficult to achieve by hand |
| Deepens the connection between the artist and the design | Saves time with quick and accurate transfers |
Remember, both hand-drawn and thermal-printed stencils have their own unique advantages and disadvantages. Consider your artistic style, the complexity of your design, and your personal preferences when selecting the right stencil method for your tattooing process.
Tips for Successful Stencil Printing
When it comes to printing tattoo stencils, achieving optimal stencil quality is crucial for a successful tattooing process. Here are some valuable tips to help you get the best results:
- Use high-quality stencil paper: Invest in good-quality stencil paper that is specifically designed for inkjet printing. This will ensure that your stencils come out crisp and clear, with no smudging or blurring.
- Adjust printer settings: Take the time to adjust the settings on your inkjet printer to optimize stencil printing. Experiment with different print speeds and resolutions to find the setting that works best for your specific needs.
- Choose the right ink: Use inkjet stencil ink that is formulated to produce vibrant and long-lasting tattoo stencils. Regular ink may not adhere well to the skin, resulting in a less precise transfer.
- Avoid excessive heat: Inkjet stencils are sensitive to heat, so it’s important to let them cool down before applying them to the skin. Excessive heat can cause the ink to smudge or transfer unevenly.
- Test print and stencil placement: Before printing a large batch of stencils, always do a test print to ensure that the design and placement are accurate. This will help you avoid wasting paper and ensure that the stencil lines up perfectly on the skin.
- Keep your printer clean: Regularly clean your inkjet printer to prevent any ink buildup or clogging that could affect stencil printing quality. Follow the manufacturer’s instructions for cleaning and maintenance.
By following these tips, you can achieve optimal stencil quality and ensure a smooth tattooing process. Remember to practice proper stencil application techniques to achieve the best results and create stunning tattoos that your clients will love.
Conclusion
As we conclude our exploration of stencil printing techniques, it’s clear that inkjet printers have become a valuable tool for tattoo artists. Whether you prefer hand-drawn stencils, digital creations, or the precision of thermal printing, an inkjet printer can bring your designs to life.
By following the step-by-step tutorials and tips provided in this article, you can ensure successful stencil printing and avoid common mistakes. Remember to prepare your inkjet stencils properly, select the right paper, and print with precision for optimal results.
Inkjet printer stencils offer a range of benefits, such as flexibility, ease of resizing, and the ability to experiment with various designs. Whether you’re a seasoned artist or just starting out, an inkjet printer can enhance your creative process and help you achieve professional-quality tattoo stencils.
In conclusion, embrace the possibilities that inkjet printer stencils offer and unleash your tattoo creativity. With the right tools and techniques at your disposal, you can bring your artistic vision to life and create amazing tattoos that leave a lasting impression.
FAQs
1. What Is Tattoo Transfer Paper?
Tattoo transfer paper, also known as stencil paper, is used to temporarily apply a tattoo design on the skin.
2. Can I Create Tattoo Stencils By Hand?
Yes, many tattoo artists use the traditional method of hand-drawing tattoo stencils to build muscle memory of the design before tattooing.
3. How Do I Create Hand-Drawn Tattoo Stencils?
To create a hand-drawn tattoo stencil, you will need your design printed on white paper, a pen or pencil, and thermographic tattoo transfer paper. Follow the step-by-step tutorial to trace your design onto the transfer paper and cut it out for application on the skin.
4. Can I Create Tattoo Stencils Digitally?
Yes, many tattoo artists prefer using digital tools like Procreate on an iPad to create precise and efficient tattoo stencils without the need for physical tracing layers.
5. What Do I Need To Create Digital Tattoo Stencils?
To create digital tattoo stencils, you will need an iPad, the Procreate app, and tattoo transfer paper to complete the process.
6. How Can I Use A Thermal Printer To Create Tattoo Stencils?
Using a thermal printer is a popular method among tattoo artists. This section explains how to load the thermal paper, print the design, and peel off the stencil for application on the skin.
7. Can I Print Tattoo Stencils With An Inkjet Printer?
Yes, if you don’t have access to a thermal printer, you can still print tattoo stencils with an inkjet printer. This section focuses on the preparation process for inkjet stencils, including filling the printer with specialized inkjet stencil ink and choosing the appropriate paper type.
8. What Types Of Paper Can I Use For Inkjet Stencil Printing?
Different types of paper can be used for inkjet stencil printing. This section explores the various options available and provides guidance on selecting the right paper for your inkjet printer stencils.
9. How Do I Print Inkjet Stencils?
Follow this step-by-step guide to prepare inkjet stencils for printing. Learn how to fill the ink tanks of your inkjet printer with specialized inkjet stencil ink and load the printer with stencil paper to ensure high-quality tattoo stencils.
10. How Do I Apply Inkjet Stencils To The Skin?
This section offers tips and techniques for transferring inkjet stencils to the skin, ensuring a clean and precise tattooing process. Learn how to remove the protective layer, position the stencil correctly, and create a roadmap for your tattoo design.
11. What Are The Pros And Cons Of Hand-Drawn Vs. Thermal-Printed Stencils?
Both hand-drawn and thermal-printed stencils have their advantages and disadvantages. This section compares the pros and cons of these two stencil methods, helping you make an informed decision on which option to choose.
12. Do You Have Any Tips For Successful Stencil Printing?
To ensure successful stencil printing with an inkjet or thermal printer, this section provides valuable tips for achieving optimal stencil quality, avoiding common mistakes, and troubleshooting any issues that may arise during the printing process.
13. What Are The Benefits Of Printing Tattoo Stencils With An Inkjet Printer?
Printing tattoo stencils with an inkjet printer opens up new possibilities for tattoo artists. Whether you choose to create stencils by hand, digitally, or with a thermal printer, each method offers unique benefits and allows for precise stencil transfer.